
Why Malware Labs Matter
Malware analysis is one of the few disciplines in cybersecurity where your working environment is simultaneously your most powerful tool and your greatest liability. A misconfigured lab does not just slow you down -- it can turn a learning exercise into a real incident, allowing malware to escape containment and infect production systems.
This lesson covers the foundational architecture of a professional malware analysis laboratory: why we use virtual machines, how the two-VM model works, what hardware you need, and how to think about the isolation boundaries that keep you safe.
The Two-VM Lab Architecture
Professional malware analysis labs use a two-VM architecture consisting of a Linux analysis VM and a Windows analysis VM, connected via an isolated virtual network. This architecture is the industry standard used in SANS FOR610, enterprise SOCs, and threat intelligence teams worldwide.
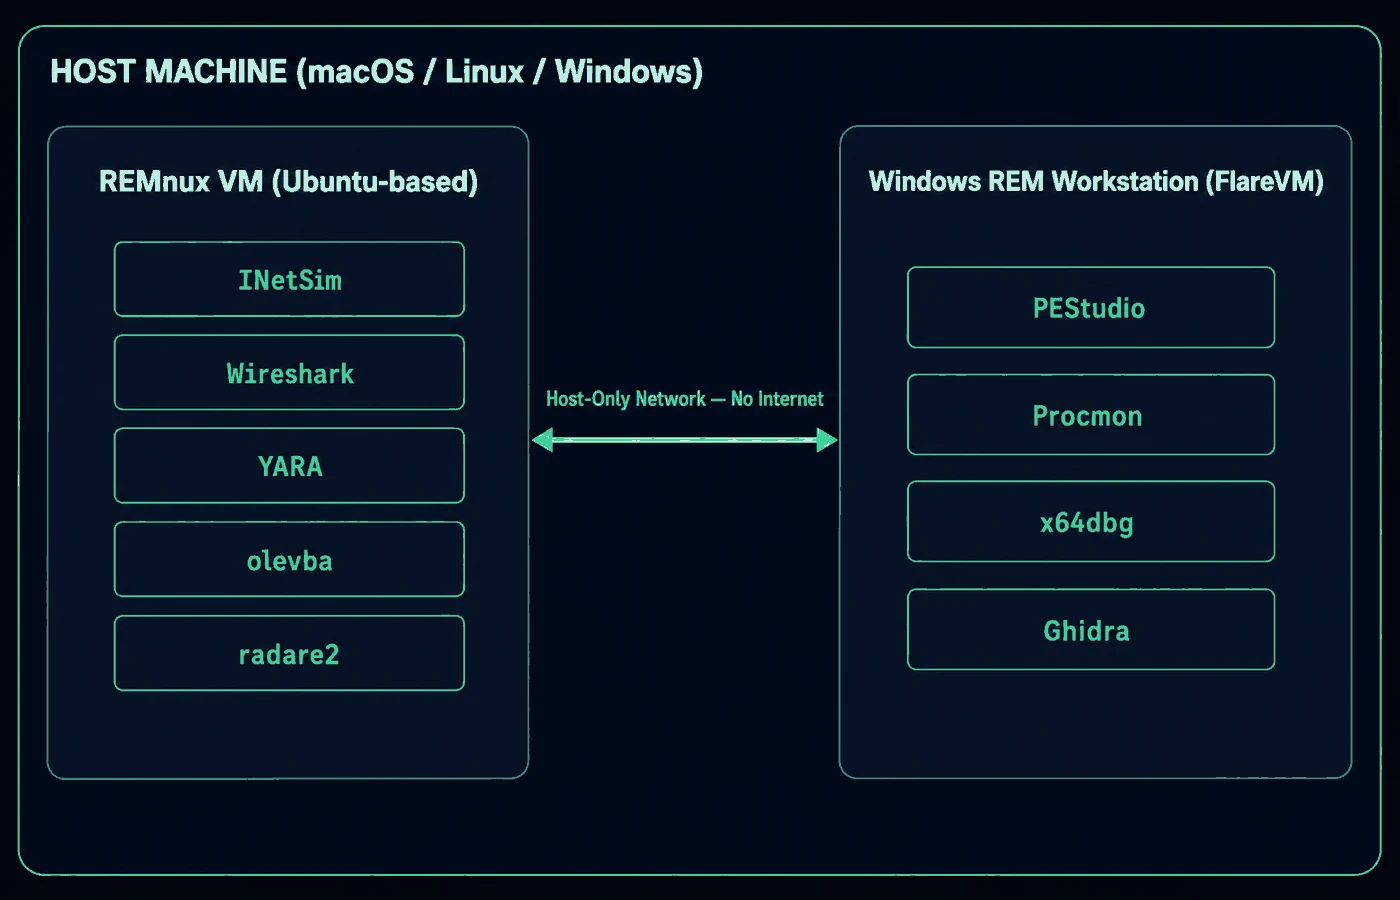
Why Two VMs?
| VM | Role | Why It Exists |
|---|---|---|
| REMnux (Linux) | Network monitoring, service simulation, Linux-based analysis tools | Provides a safe "internet" for malware to talk to via INetSim/FakeNet; runs tools that work best on Linux (YARA, olevba, radare2) |
| Windows REM Workstation (FlareVM) | Malware execution and Windows-specific analysis | Most malware targets Windows; you need a real Windows environment to observe native behavior with Procmon, Process Explorer, x64dbg, etc. |
The Linux VM acts as the network gateway and monitoring station. The Windows VM is where you actually detonate (execute) samples. This separation means that even if malware fully compromises the Windows VM, it cannot reach the internet or your LAN -- its traffic goes to the REMnux VM, which is logging everything.
Read "host-only" carefully. A host-only adapter connects the guest to your host machine -- that is what the name means. It cuts the VM off from the internet, not from you. Your host is inside the blast radius, which is why shared folders, clipboard sharing and drag-and-drop must all stay off, and why you never analyse on a machine you cannot afford to rebuild. For VM-to-VM traffic with no host-facing interface at all, VirtualBox's Internal Network (
intnet) is the stronger setting.
Hardware Requirements
Your lab performance depends heavily on your host machine. Running two VMs simultaneously while recording network traffic and process activity is resource-intensive.
Minimum Specifications
| Component | Minimum | Recommended |
|---|---|---|
| CPU | 4 cores (Intel VT-x / AMD-V required) | 8+ cores |
| RAM | 16 GB | 32 GB or more |
| Storage | 100 GB free (SSD) | 256 GB+ NVMe SSD |
| Hypervisor | VMware Workstation Player (free) | VMware Workstation Pro / Fusion Pro |
Pro Tip: Always verify that hardware virtualization (VT-x/AMD-V) is enabled in your BIOS/UEFI. Without it, VMs will be painfully slow or fail to start entirely. Check with:
# Linux: check for vmx (Intel) or svm (AMD) flags
grep -Ec '(vmx|svm)' /proc/cpuinfo

# macOS: check for VMX support
sysctl -a | grep machdep.cpu.features | grep VMX

# Windows PowerShell:
Get-ComputerInfo -Property "HyperV*"
Hypervisor Selection
| Hypervisor | Platform | Cost | Best For |
|---|---|---|---|
| VMware Workstation Pro | Windows/Linux | Paid | Professional lab use, best snapshot support |
| VMware Fusion Pro | macOS | Paid | Mac-based analysts |
| VirtualBox | Cross-platform | Free | Budget setups (fewer features) |
| Hyper-V | Windows Pro/Enterprise | Free (built-in) | Windows-only environments |
VMware is strongly preferred because of its robust snapshot management, NAT/host-only networking configuration, and broad compatibility with pre-built analysis VM images.
Key Isolation Principles
1. Network Isolation
The single most critical configuration. Your analysis VMs must never have direct internet access during analysis.
WRONG:  VM → NAT → Internet        (malware can reach C2 servers)
WRONG:  VM → Bridged → LAN          (malware can spread laterally)
RIGHT:  VM → Host-Only → REMnux     (malware talks only to your simulator)
2. Snapshot Discipline
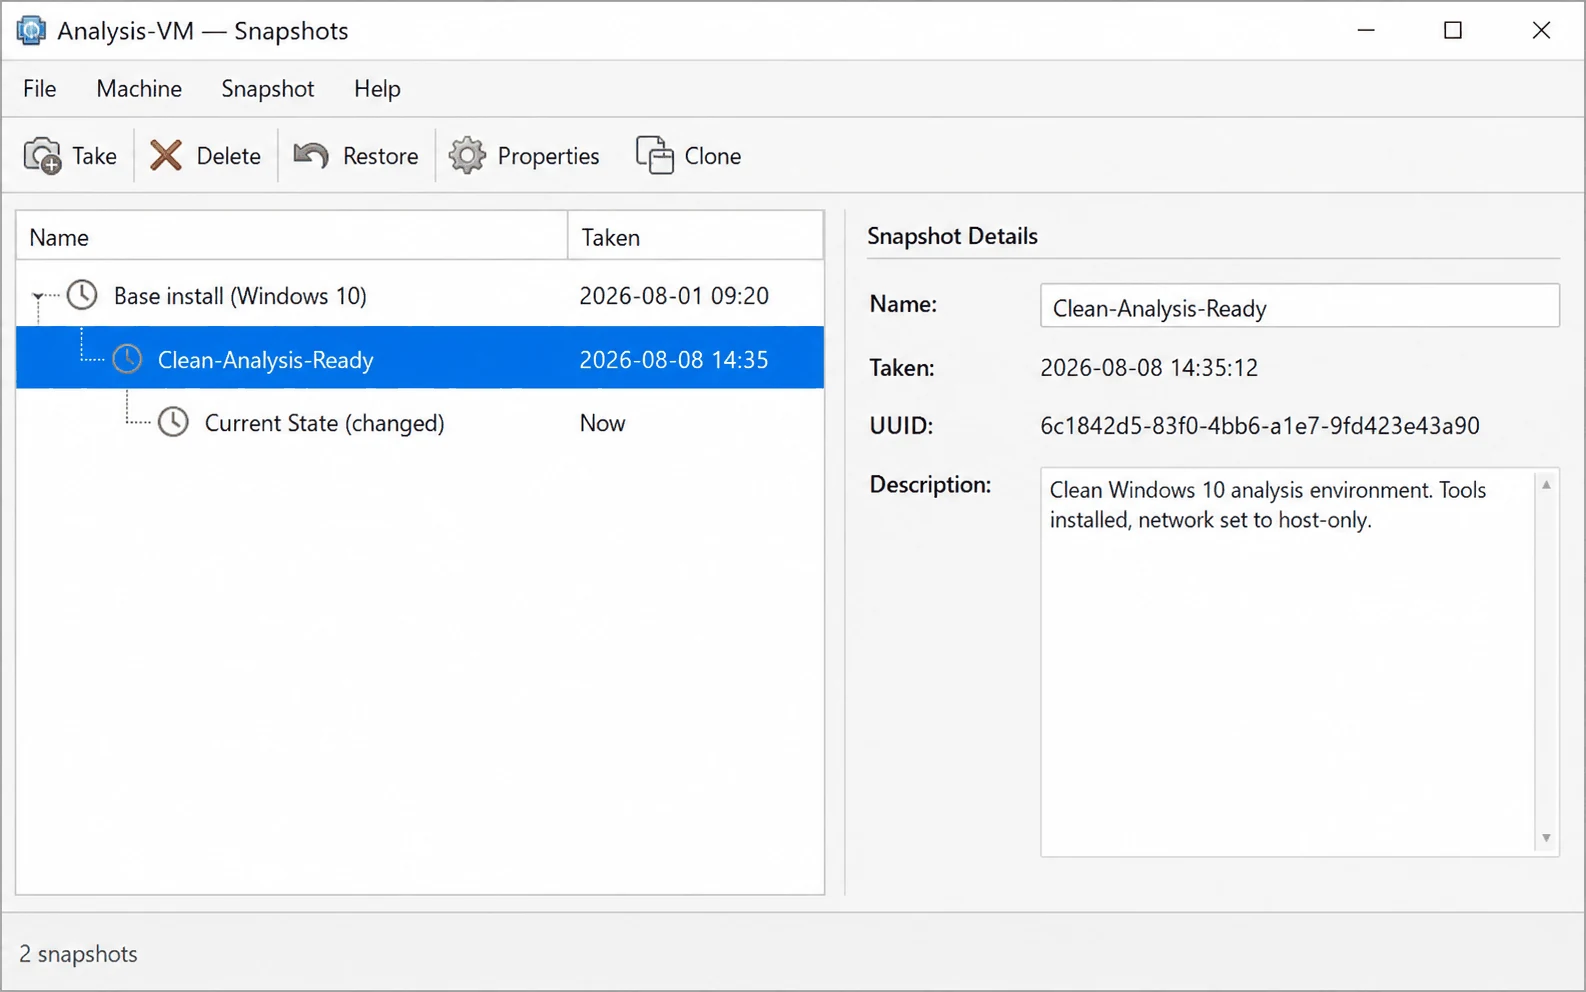
Snapshots are your undo button. Without them, you must rebuild your VM from scratch after every analysis session.
The Golden Rule: Always revert to a clean snapshot before analyzing a new sample. Never analyze two samples on the same dirty VM state.
Snapshot Strategy:
─────────────────
1. Build VM → Install all tools → Update everything
2. Take snapshot: "Clean-Analysis-Ready"
3. Before each sample: Revert to "Clean-Analysis-Ready"
4. Analyze sample → Collect data
5. After analysis: Revert to "Clean-Analysis-Ready" again
6. Periodically: Update tools → Take new "Clean-Analysis-Ready" snapshot
3. Assume Breach
Always operate under the assumption that malware will attempt to:
- Detect it is running in a VM and alter its behavior
- Escape the VM via shared folders, clipboard, or drag-and-drop
- Exploit hypervisor vulnerabilities (rare but documented)
- Reach out to C2 infrastructure if any network path exists
Setting Up REMnux
REMnux is a free Linux distribution maintained by Lenny Zeltser, specifically designed for malware analysis. It comes pre-loaded with hundreds of analysis tools.
# Download the REMnux OVA from https://REMnux.org
# Import into VMware: File → Open → select the .ova file

# After import, configure networking:
# VM Settings → Network Adapter → Host-only

# Verify the installation:
remnux --version

# Update all tools to latest versions:
sudo remnux update

# Key directories to know:
/opt/remnux/         # REMnux-specific tools
/usr/local/bin/      # Analysis utilities
Setting Up Windows REM Workstation (FlareVM)
FlareVM is a Windows-based malware analysis distribution maintained by Mandiant. It installs on top of a standard Windows installation using a package manager.
# Start with a clean Windows 10/11 VM
# Disable Windows Defender and Windows Update
# Open PowerShell as Administrator:

Set-ExecutionPolicy Unrestricted -Force
(New-Object net.webclient).DownloadFile(
  'https://raw.githubusercontent.com/mandiant/flare-vm/main/install.ps1',
  '$env:TEMP\install.ps1'
)
Unblock-File $env:TEMP\install.ps1
& $env:TEMP\install.ps1

# Installation takes 30-60 minutes
# After completion, take a "Clean-Analysis-Ready" snapshot immediately
Common Pitfalls
| Pitfall | Consequence | Prevention |
|---|---|---|
| Leaving shared folders enabled | Malware traverses to host filesystem | Disable shared folders in VM settings |
| Using NAT networking | Malware contacts real C2 servers | Always use host-only networking |
| Forgetting to snapshot | Hours of tool installation lost after revert | Snapshot immediately after setup |
| Analyzing on host machine | Host infection, data loss | Never. Always use a VM. |
| Clipboard sharing enabled | Data exfiltration from host | Disable copy-paste between host and guest |
| Running outdated VM tools | Known escape vulnerabilities | Update VMware Tools regularly |
What You Will Learn in This Module
By the end of this onboarding module, you will be able to:
- Build a fully isolated two-VM malware analysis lab
- Configure host-only networking between REMnux and Windows REM
- Implement a snapshot discipline that protects your environment
- Understand legal and ethical boundaries for malware analysis
- Verify your tool installations and lab readiness
- Follow proper malware handling and safety procedures
The lab you build here will be used throughout every subsequent module. Take the time to get it right -- a solid lab foundation prevents countless headaches later.