
VM Isolation Fundamentals & Safety Procedures
Malware analysis is inherently dangerous work. You are deliberately executing software designed to compromise systems. This lesson covers the detailed safety procedures, malware handling protocols, incident response for accidental execution, and the legal framework every analyst must understand before touching a live sample.
Network Isolation Deep Dive
Network isolation is the single most important safety control in your lab. If you get nothing else right, get this right.
How Host-Only Networking Works
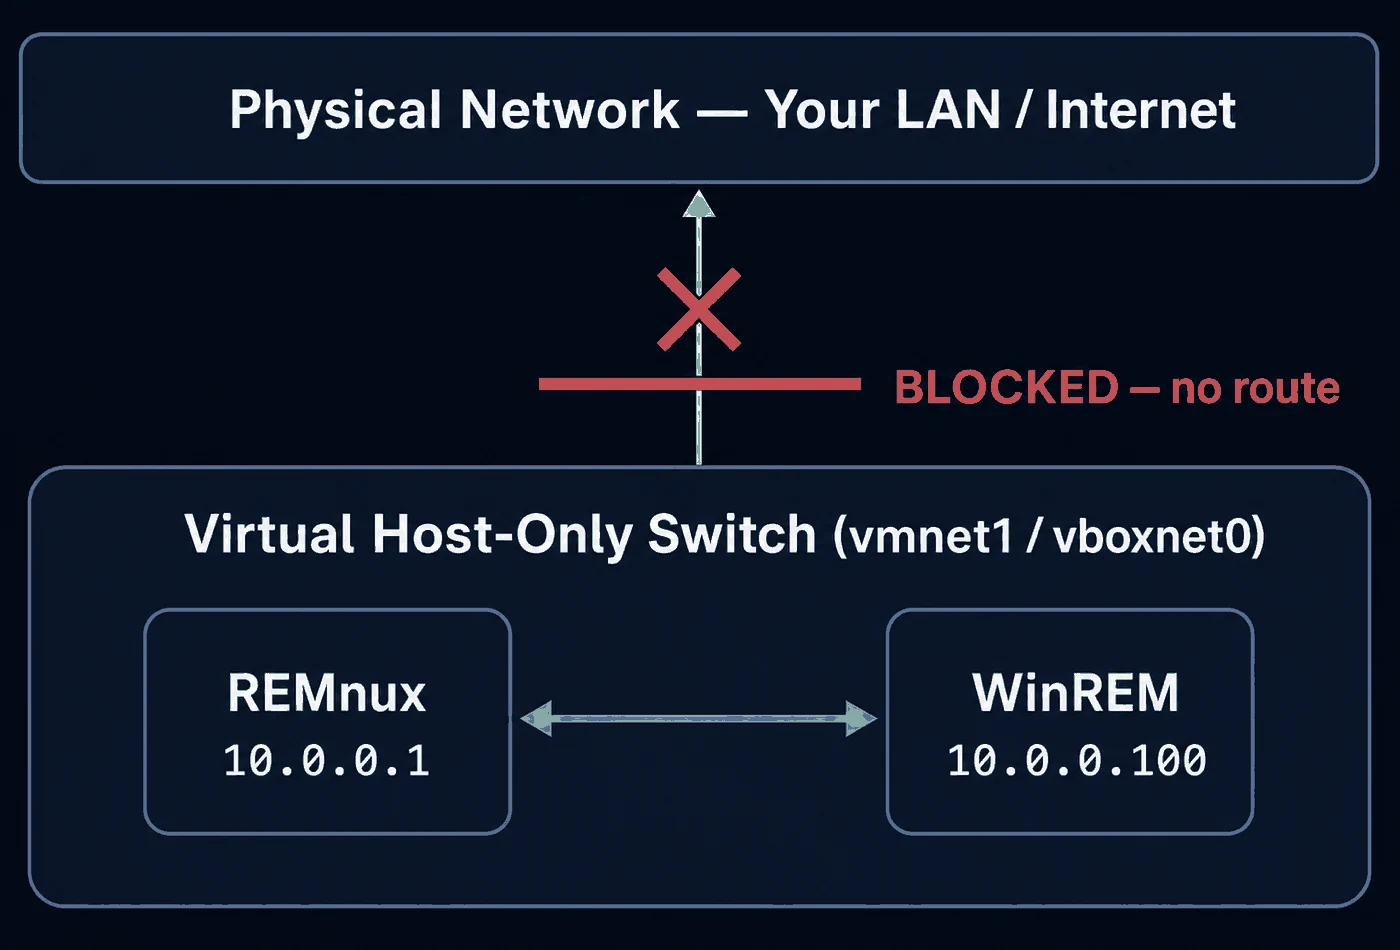
When you configure a VM adapter as "host-only," the hypervisor creates a virtual network switch that exists only on your host machine. VMs connected to this switch can talk to each other and to the host, but have zero path to the physical network or the internet.
Configuring Host-Only Networking in VMware
# VMware Workstation (Linux/Windows):
# Edit → Virtual Network Editor
# Select vmnet1 (Host-only)
# Ensure "Connect a host virtual adapter" is checked
# Set subnet: 10.0.0.0 / 255.255.255.0
# UNCHECK "Use local DHCP service" (assign static IPs)

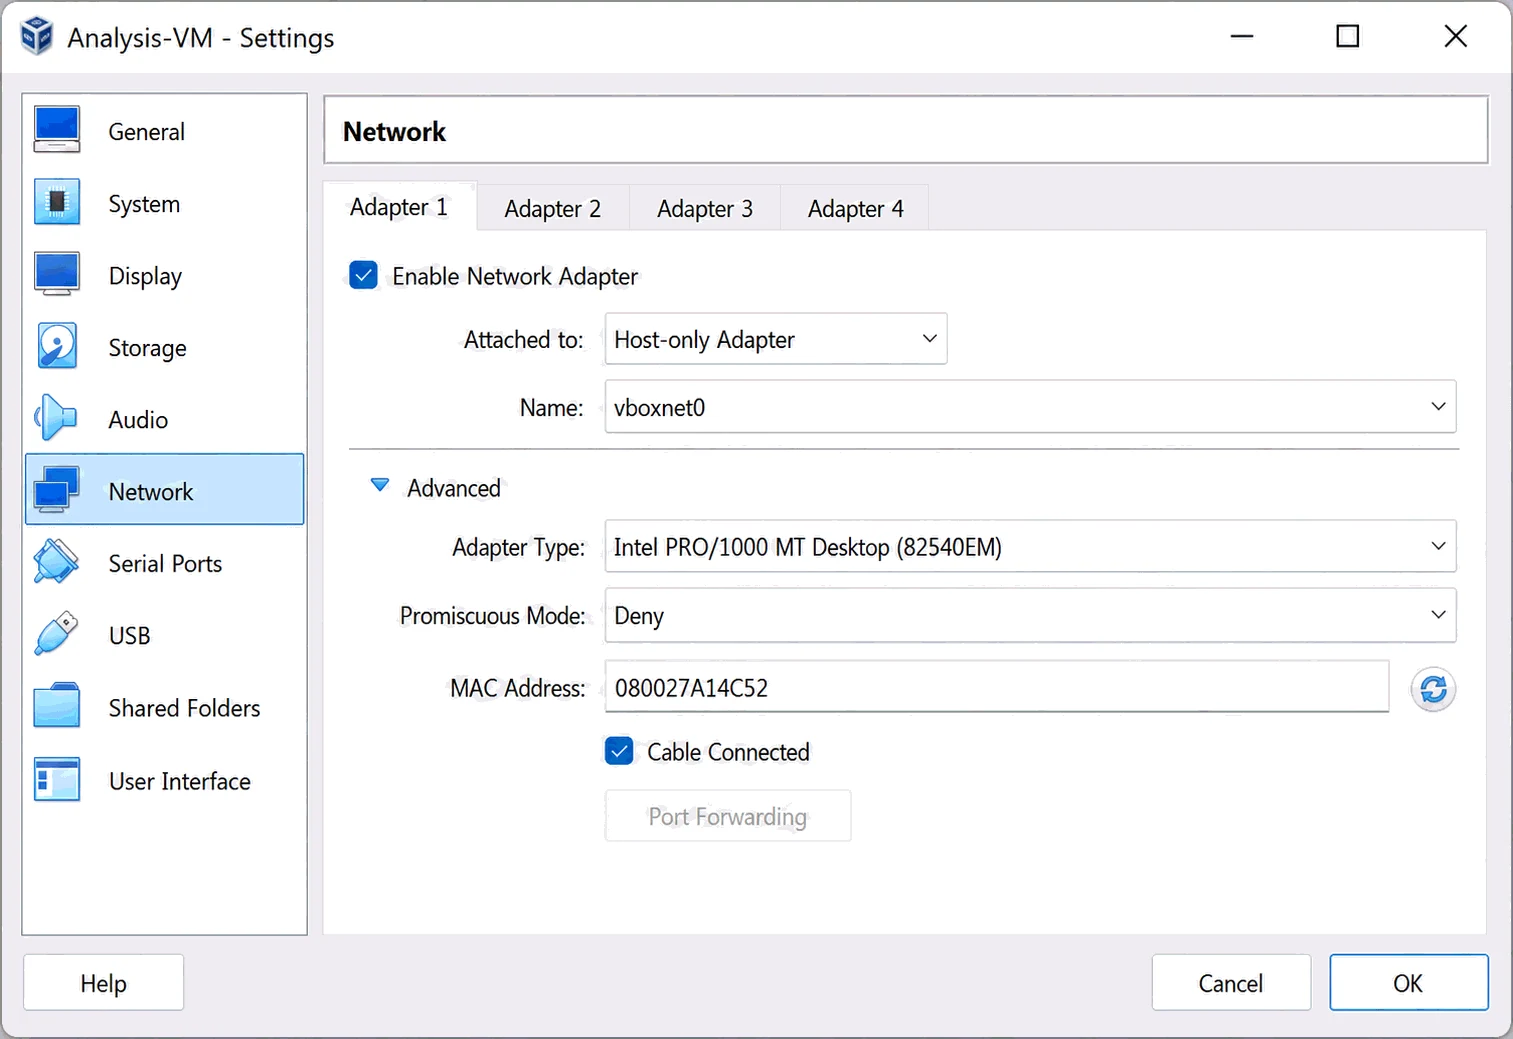
# For each VM: VM Settings → Network Adapter → Host-only
# Assign static IPs inside the VMs:

# REMnux (set as the gateway/DNS for the Windows VM):
sudo ip addr add 10.0.0.1/24 dev ens33
sudo ip link set ens33 up

# Windows REM Workstation:
# Network Adapter → IPv4 Properties:
#   IP: 10.0.0.100
#   Subnet: 255.255.255.0
#   Gateway: 10.0.0.1
#   DNS: 10.0.0.1
Verifying Network Isolation
Always verify isolation before starting analysis. Run these checks every time you revert to a snapshot:
# From Windows REM Workstation:
ping 10.0.0.1          # Should SUCCEED (REMnux)
ping 8.8.8.8           # Should FAIL (no internet)
ping google.com        # Should FAIL (no DNS to internet)
nslookup google.com    # Should be handled by INetSim on REMnux

# From REMnux:
ping 10.0.0.100        # Should SUCCEED (Windows VM)
curl http://10.0.0.100 # Test connectivity
CRITICAL: If
ping 8.8.8.8succeeds from your analysis VM, STOP immediately. Your isolation is broken. Do not proceed until you fix the network configuration.
Network Service Simulation
Malware often needs to resolve DNS, download payloads via HTTP, or beacon to C2 servers. If those connections simply fail, the malware may not exhibit its full behavior. Service simulators trick the malware into thinking it has real internet access.
INetSim (on REMnux)
INetSim is the industry-standard network service simulator. It can emulate DNS, HTTP, HTTPS, SMTP, FTP, and dozens of other protocols.
# Start INetSim on REMnux:
sudo inetsim

# Default configuration listens on all interfaces
# Key simulated services:
#   DNS  → Port 53   (resolves all domains to REMnux IP)
#   HTTP → Port 80   (serves dummy files)
#   HTTPS→ Port 443  (with self-signed certificate)
#   SMTP → Port 25   (captures outgoing emails)
#   FTP  → Port 21   (serves/captures files)

# Check the INetSim log for malware activity:
cat /var/log/inetsim/service.log

# Example output when malware calls home:
# [2024-01-15 14:23:01] DNS: Query for evil-c2.com from 10.0.0.100
# [2024-01-15 14:23:02] HTTP: GET /gate.php from 10.0.0.100
# [2024-01-15 14:23:02] HTTP: POST /exfil from 10.0.0.100
FakeNet-NG (on Windows)
FakeNet-NG is an alternative that runs directly on the Windows analysis VM. Useful when you want to capture network activity on the same machine.
# Launch FakeNet-NG from the FlareVM desktop shortcut or:
C:\Tools\FakeNet-NG\fakenet.exe

# FakeNet intercepts ALL network traffic from the local machine
# and redirects it to local listeners
| Tool | Platform | Best For |
|---|---|---|
| INetSim | REMnux (Linux) | Full lab simulation, multi-VM setups |
| FakeNet-NG | Windows | Single-VM analysis, quick triage |
Snapshot Management Workflow
Snapshots are the backbone of safe malware analysis. They allow you to revert your VM to a known-good state in seconds, no matter how badly the malware corrupts the system.
Snapshot Naming Convention
Use a consistent naming scheme so you always know the state of each snapshot:
Recommended naming:
────────────────────
[VM-Name]_[State]_[Date]_[Notes]

Examples:
  WinREM_CleanReady_2024-01-15_AllToolsUpdated
  WinREM_PreExec_2024-01-15_Sample-abc123
  REMnux_CleanReady_2024-01-15_INetSimConfigured
Snapshot Workflow Per Analysis Session
1. REVERT both VMs to "CleanReady" snapshots
2. VERIFY network isolation (ping tests)
3. START monitoring tools:
   - REMnux: INetSim + Wireshark
   - Windows: Procmon + Process Explorer
4. TRANSFER sample to Windows VM (host-only network copy)
5. SNAPSHOT Windows VM as "PreExec_[sample-hash]" (optional)
6. EXECUTE the sample
7. OBSERVE for 3-5 minutes minimum
8. COLLECT all logs and captures
9. EXPORT data to host or shared analysis folder
10. REVERT both VMs to "CleanReady"
VMware Snapshot Commands
# Command-line snapshot management (VMware):
vmrun snapshot "/path/to/vm.vmx" "CleanReady"
vmrun revertToSnapshot "/path/to/vm.vmx" "CleanReady"
vmrun listSnapshots "/path/to/vm.vmx"
vmrun deleteSnapshot "/path/to/vm.vmx" "OldSnapshot"
Pro Tip: Snapshots consume disk space proportional to the changes made since the snapshot was taken. If you analyze many samples without reverting, your snapshot delta files can grow to tens of gigabytes. Revert frequently.
Malware Handling Protocols
The Password-Protected Archive Convention
Malware samples are shared within the security community using password-protected ZIP or 7z archives. The universal convention is:
| Format | Password | Purpose |
|---|---|---|
| ZIP (AES encrypted) | infected | Standard community sharing |
| 7z | infected | Better compression, stronger encryption |
| ZIP | malware | Alternative convention (less common) |
This convention exists to prevent:
- Accidental execution by users who receive the file
- Automated scanning and deletion by email gateways and AV engines
- Triggering alerts on file transfer systems
# Creating a password-protected sample archive:
zip -P infected sample.zip malware.exe
7z a -pinfected sample.7z malware.exe

# Extracting (ALWAYS do this inside your analysis VM):
unzip -P infected sample.zip
7z x -pinfected sample.7z
CRITICAL: Never extract malware archives on your host machine. Always transfer the archive to your analysis VM first, then extract inside the VM.
Safe File Transfer to Analysis VMs
# Method 1: SCP over host-only network (preferred)
scp sample.zip remnux@10.0.0.1:/home/remnux/samples/

# Method 2: Python HTTP server on host, download in VM
# On host:
python3 -m http.server 8080 --directory /path/to/samples/
# In VM browser: http://[host-only-ip]:8080/sample.zip

# Method 3: Drag-and-drop (DISABLE after transfer)
# VMware: VM Settings → Options → Guest Isolation
# Enable drag-and-drop temporarily, transfer, then DISABLE
Accidental Execution Response Plan
Even experienced analysts occasionally make mistakes. Having a rehearsed incident response plan for accidental malware execution is essential.
If Malware Executes on Your Analysis VM (Expected)
This is normal and expected during dynamic analysis. Continue your analysis workflow.
If Malware Executes on Your Host Machine
Immediately perform the following steps:
INCIDENT RESPONSE - HOST INFECTION
════════════════════════════════════
1. DISCONNECT from the network (pull Ethernet / disable Wi-Fi)
2. DO NOT power off (you may lose volatile forensic data)
3. DOCUMENT what happened:
   - What file was executed?
   - When did it happen?
   - What symptoms are observed?
4. CAPTURE memory if possible (use a memory acquisition tool)
5. NOTIFY your security team / incident response lead
6. PRESERVE the system for forensic analysis
7. REBUILD from a known-good image (do NOT just "clean" it)
Prevention Checklist
- Host AV is running and up to date (as a safety net)
- Analysis VMs use host-only networking
- Shared folders are disabled
- Clipboard sharing is disabled
- Drag-and-drop is disabled (except during file transfer)
- Host firewall blocks connections from VM subnet
- Samples are always stored in password-protected archives on the host
Legal Considerations
What Is Generally Permitted
Malware analysis for defensive purposes is broadly legal in most Western jurisdictions, including under the US Computer Fraud and Abuse Act (CFAA) and the EU Cybersecurity Act. Specifically, you may:
- Analyze malware found on systems you own or are authorized to investigate
- Reverse-engineer malware to understand its behavior and develop defenses
- Share indicators of compromise (IOCs) with the security community
- Submit samples to public sandboxes (with appropriate authorization)
What Is Generally Prohibited
| Activity | Why It Is Problematic |
|---|---|
| Running malware on systems you do not own | Unauthorized access (CFAA violation) |
| Accessing active C2 infrastructure | May constitute unauthorized access |
| Distributing malware without authorization | Distribution of malicious software |
| Weaponizing analysis findings | Creating offensive tools from defensive research |
| Publicly attributing attacks without evidence | Potential defamation, geopolitical consequences |
Organizational Policies
Before conducting malware analysis in a professional setting, ensure you have:
- Written authorization from your organization to perform analysis
- An isolated lab that meets your organization's security requirements
- Data handling procedures for any sensitive data found in samples (PII, credentials, etc.)
- Incident reporting procedures if something goes wrong
- Sample retention policies covering how long you keep samples and where
Pro Tip: Document everything. Keep a lab journal with dates, sample hashes, what you did, and what you found. This protects you legally and creates an audit trail.
Lab Hygiene Best Practices
| Practice | Frequency | Why |
|---|---|---|
| Revert VMs to clean snapshots | Before each sample | Prevents cross-contamination between samples |
| Update VM tools and analysis software | Monthly | Security patches, new detection capabilities |
| Verify network isolation | Before each session | Ensure no configuration drift |
| Audit snapshot storage | Weekly | Prevent disk space exhaustion |
| Back up "CleanReady" snapshots | Monthly | Protect against snapshot corruption |
| Review INetSim/FakeNet logs | After each session | Ensure no unexpected traffic patterns |
| Rotate sample storage | Quarterly | Remove old samples per retention policy |